A client contacted me about the possibility of Cerakoting some axe heads. As we talked about his project I realized that if he would write it up, this information would make for a great guest post on the blog. So we discussed it and he agreed. I thank Mr. Leslie Hill for presenting us with Vintage Axes & Body Armor.
The Question
How does one reduce maintenance to almost nil and keep rust from damaging an axe head?
The Short Answer
Cerakote it.
The Long Answer
This endeavor began when something one of my drill instructors said (hollered) kept rattling around in my head. He said, “If you take care of your weapon, it’ll take care of you.” The rattling started after I watched some YouTube video about this super-high-tech lubricant used in race engines. Okay, so that got me to thinking about how much easier maintenance would have been on my family’s race motorcycles, and then the ‘maintenance’ part got me to thinking about finding a better way to take care of my everyday user axes. I had already implemented a self-imposed preventative maintenance program for my collectible axes, which included inventory, cleaning, inspecting, adjusting, repair (if necessary), and lubricating/preserving. While I refer to them as a collectible, I still use them… just not every day. The rattling continued until I remembered how ceramic coatings on an exhaust not only make it look better and helped to reduce heat, but it actually improved the flow of exhaust gases through the exhaust. That’s about the time the rattling transitioned to a constant buzz.
High-tech Solution – I have personally witnessed the abuse that Cerakote ceramic coatings can take when applied to firearms, but I wasn’t sure how well it performed on axes. The only thing my research could uncover was a handful of tactical tomahawks that had been Cerakoted to match the owner’s carbine. I found no information about how well it stood up to the abuse of chopping wood. At that point, I figured that since there wasn’t any data, I was going to have to create some. First on the agenda… find a trusted Cerakote applicator.
Everyone at the gun club knows Patrick Heraghty, it seems. I knew ‘of’ him, but just never had the occasion to actually meet the area’s most favored gunsmith. Pat is the owner and operator of Classic American Gunsmith in Charlottesville, Virginia; and not only does he service firearms, he can Cerakote them too.
I got in touch with Pat and explained what I was hoping to do. He assured me that it would be a piece of cake. I decided that since Cerakote has several series of coatings, one of which is advertised to be even better than their popular H-series, I decided to have two axe heads done in two different series to see which one would work best on an axe.
Three and a Half-pound Razor Blades – The test subjects I chose were two nearly identical, vintage Council Tool Dayton pattern felling axes. I also included a third test subject to serve as somewhat of a control. It’s a vintage Collins Jersey pattern felling axe. I had previously reconditioned it, so it got a fresh coat of factory-matched paint; and since I was going to be testing ‘coatings’, I painted the forward half of the axe with regular ol’ Rust-Oleum metallic spray paint.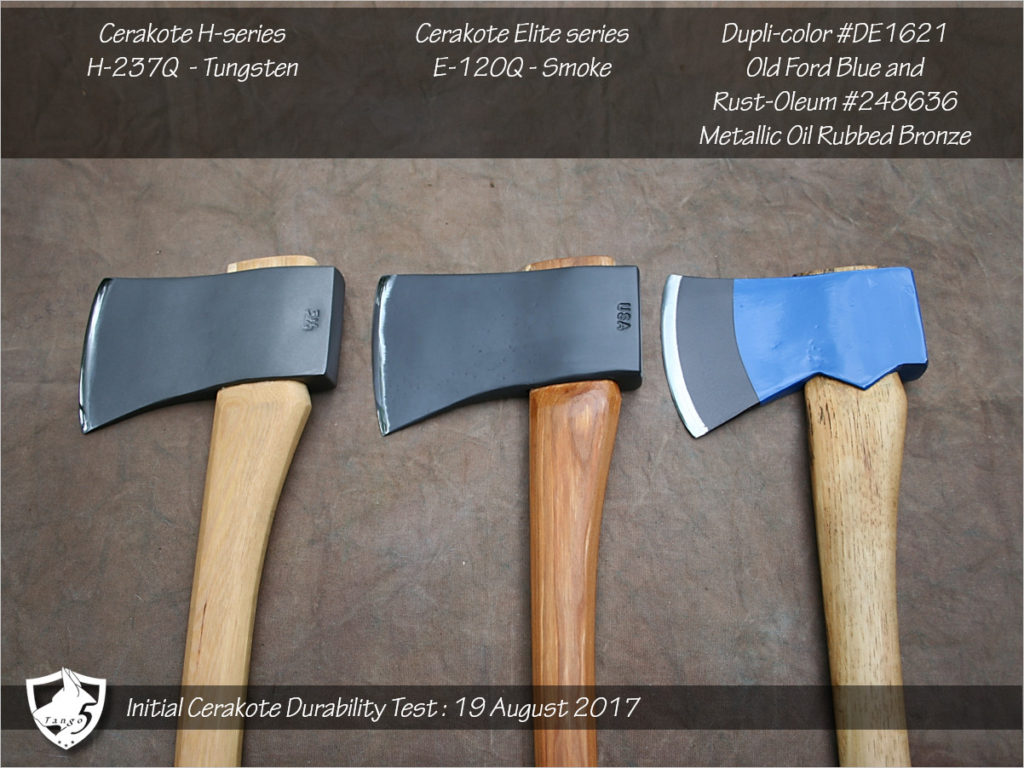
Coating Process – I prepped the two Council axe heads by stripping them down to bare steel, reprofiling the bits and putting the initial 32.5° grind on them.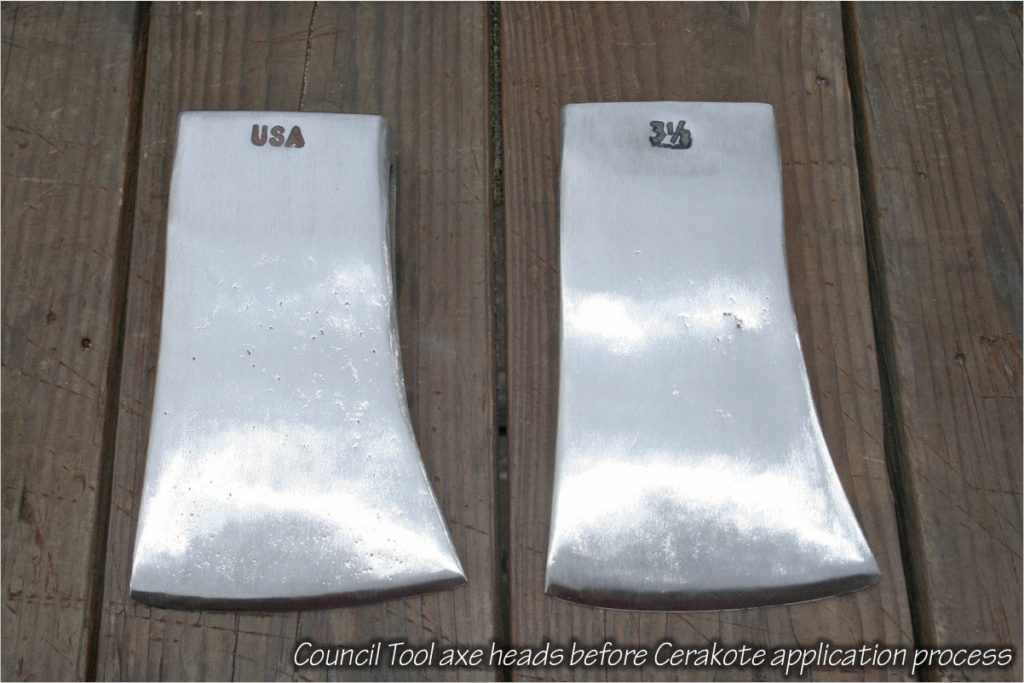
I then sanded them down with a 120 grit flap wheel on a drill to get them ready for what Pat had lined up as part of the Cerakoting process. In a nutshell, the heads would be grit blasted with 120 grit aluminum oxide, cleaned, sprayed, and then oven-cured at 250° for two hours. Pat explained that the H-series is applied in a very thin layer, I’m talking a thickness of just .001 to .0005. What’s even more incredible is that the Elite Series is applied at about half the thickness of the H-series!
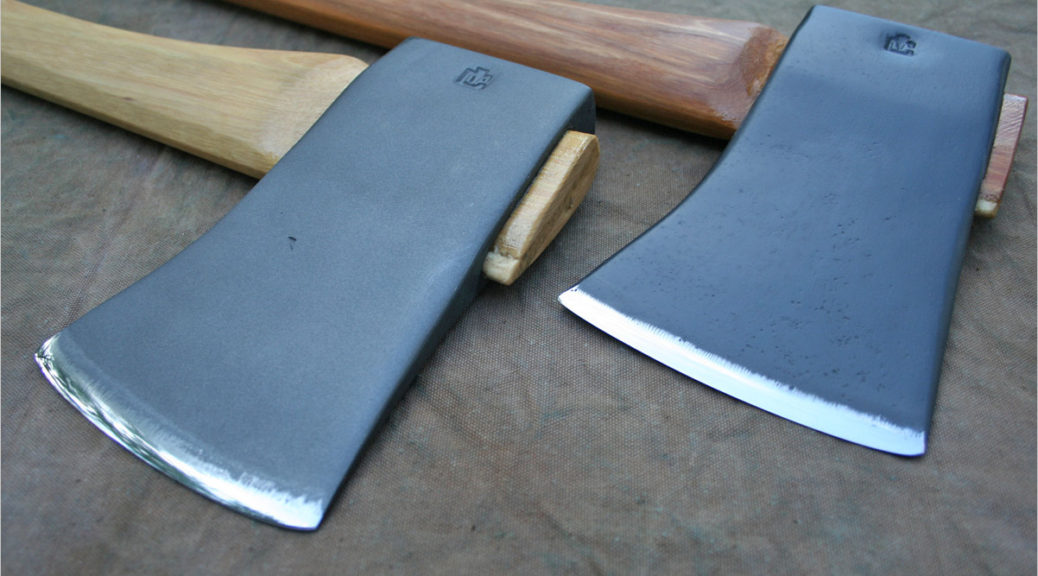
The first time I saw what the axe heads looked like was just after they were sprayed and about to go into the over.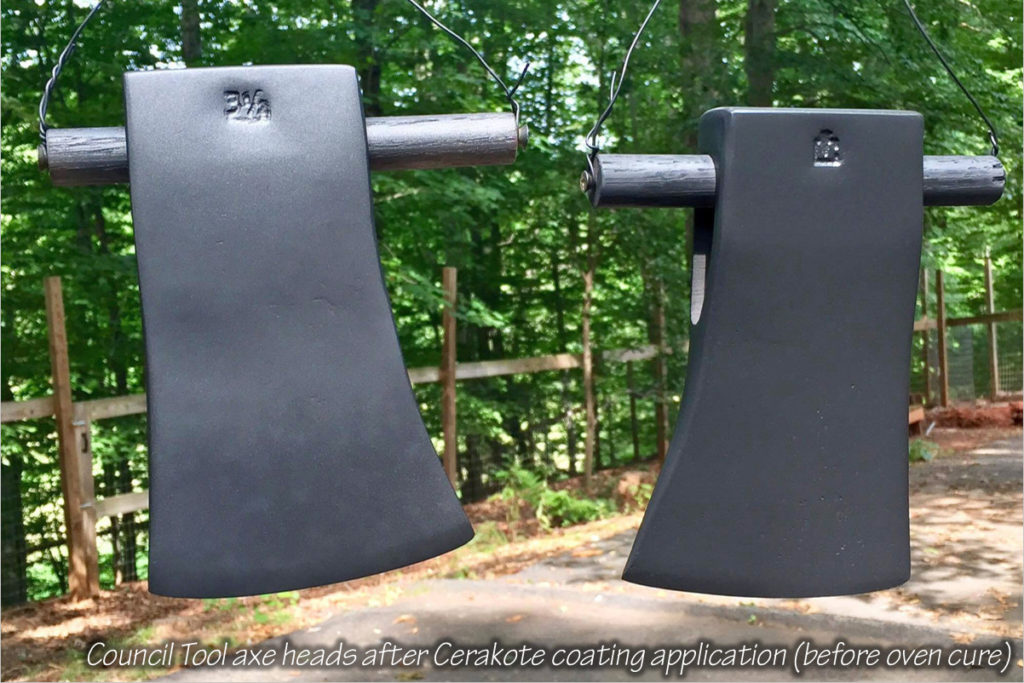
It was immediately obvious that the coating was WAY different than paint. Suddenly those two vintage axes looked like modern, high-tech tools. By the time they were cured, I was on my way to pick them up. I couldn’t get over how… well, ‘slippery’ they felt.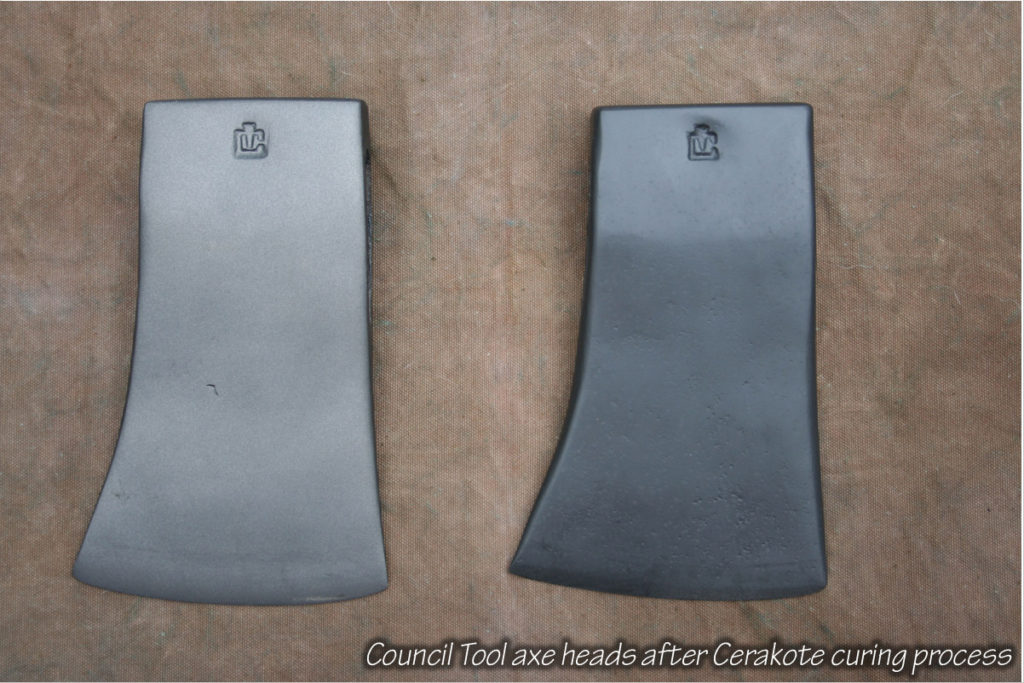
I don’t mean smooth either. I mean literally slipperier than dog slobber!
Wait… Do that again – Those words express a common reaction to a magician performing an unbelievable, unfathomable magic trick. It also happens to be the reaction you’ll get when you try to sharpen the bit of an axe that has been Cerakoted. I use a sharpening technique that most ‘Axe Junkies’ are familiar with and is referred to as the ‘Rooster Method’. It uses various grits of sandpaper on a drywall sanding pad. Since I had already established my 32.5° bevel, all I really had to do was hone it with the sanding pad… so I thought.
I started with 80 grit paper, and it just slid right off of the bit. I then tried using a brand new piece of 80 grit paper, but after two strokes, it just kept sliding right off of the bit. I was dumbfounded by what was happening, so I surrendered the sanding pad, and fired up my belt sander. Once I had the coating removed for the bits, sharpening them was a walk in the park.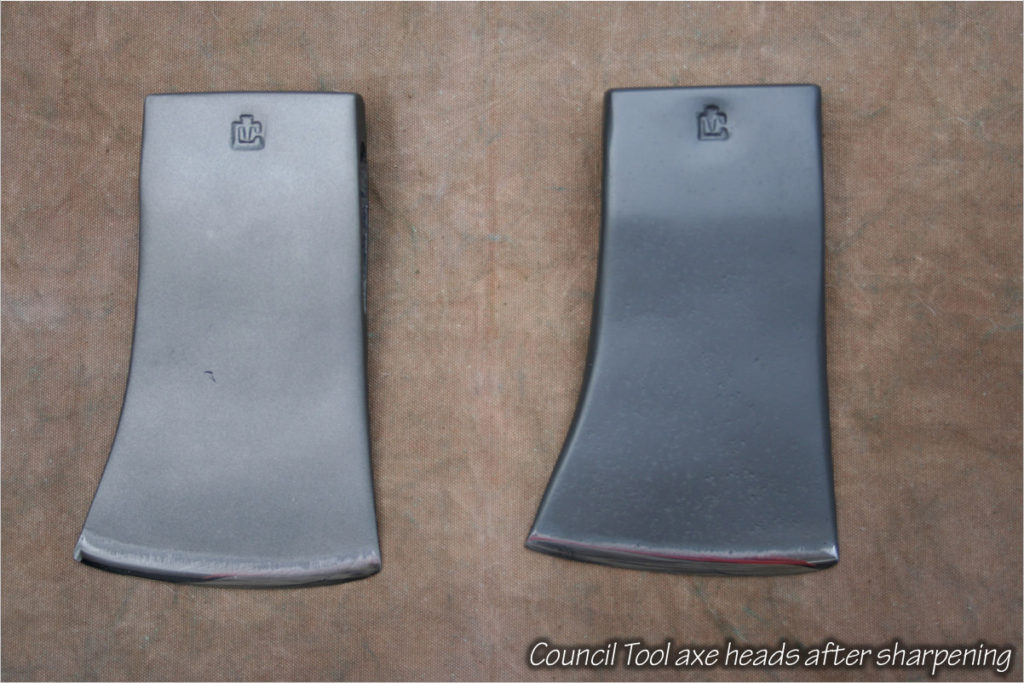
I seized the opportunity to adjust my grinds on the two Council axes. They were originally set at 32.5°, but since the Collins possessed a 27.5°, I matched the Councils to the Collins.
I would later discover that not only was the Cerakote slippery, but the little amount of coating material that had been removed loaded the sandpaper up and rendered it useless. It was almost like trying to sharpen the blade with a bar of soap. I was able to rejuvenate the sanding belt lickety–split with a stick of belt cleaner.
I hung them on 36” handles and got my second surprise of the day.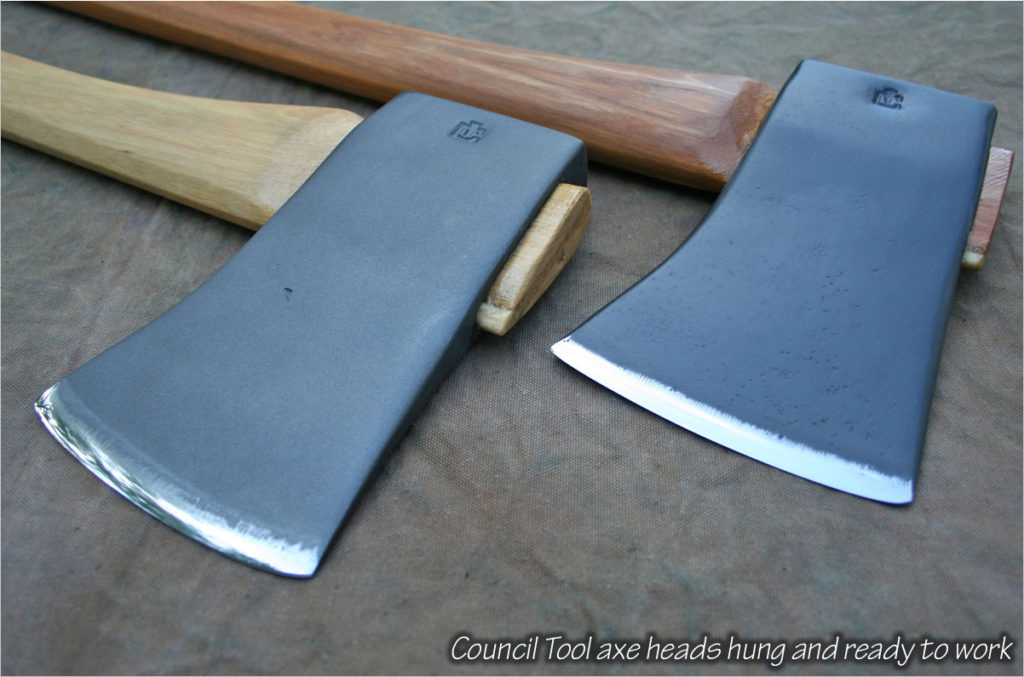
While putting the finishing touches on the top of the handle, which I do with a file, the file glanced off and skidded across the top of the axe. On any other protective finish that I have ever put on an axe blade, it would have left a scratch. Then again, that’s what files do. I hated to look, but I forced myself to survey the damage. I had to replay what just happened to make sure I wasn’t losing my mind. I looked again and confirm that there wasn’t a single scratch. Nothing. To say that I was excited to see how this stuff performed would be a gross understatement.
Show Time – My alarm clock is set for zero-dark-thirty during the work week, and Saturday morning I was awake before it went off. I had to run a couple of errands first, and then my dog and I would be headed to the woods before it got too hot. So, we all know what happens to plans when the first shot is fired, right? By the time we got into the woods, it was already 91° F. With the relative humidity hanging around 45%, it equaled 94° F, according to the heat index. Meh… what’s another 3 degrees?
Ambushed – I selected an 8” diameter limb from a Chestnut Oak that did a face plant earlier this year and bucked through it with the Collins Jersey. I was generating some pretty wicked head speed, as I could hear the ‘swoosh’ of the axe slicing through the air. I did the same thing with the two Councils and was getting things set up to take some pictures when I felt something sharp inside my boot. It felt kind of like a splinter, but not really. I discovered that a Yellow Jacket had wedged himself between my ankle and my boot, and he wasn’t happy. Apparently, he had hollered for help, because his buddy tagged me on the back of the leg. It was only when I spun around that I realized that I was being ambushed. Halo (the dog) wasn’t immune to the attack either. He was on the ground trying to rub away a couple of stings that he had gotten to the face. I pulled a few more off of him, which is when I really got lit up. By the time I got to my truck, I killed two more Yellow Jackets, which put my sting count at nine. I found three on Halo. What really sucked was that all of my gear was still in the middle of the pissed off Yellow Jacket swarm. I got stung three more times pulling it all out.
While that last paragraph may seem like I got WAY off topic, I felt it was necessary to explain why I only have one picture of an axe in the woods bucking limbs.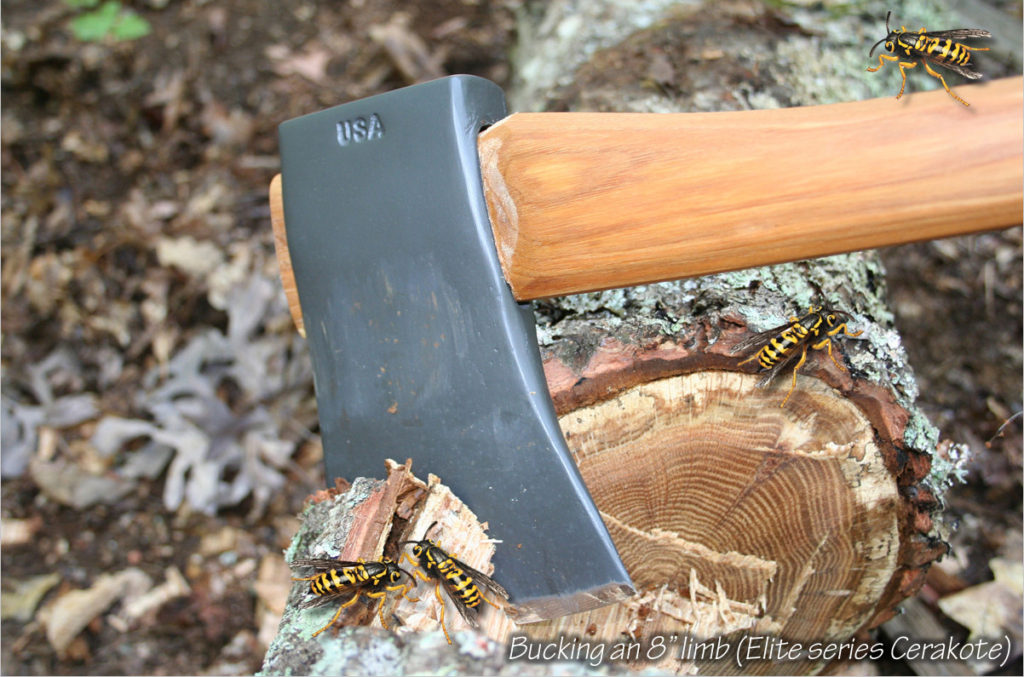
The Yellow Jackets in the picture are compliments of Photoshop. From there, the remainder of the experiment was conducted out at the wood pile where my buddy had recently dropped off a load of Red Oak rounds.
Half Rounds to Billets – Splitting what I had bucked up in the woods had been overcome by events, so splitting Red Oak would have to suffice. I found two 14” rounds, split them in half with a maul, and proceeded to process some firewood with the test axes.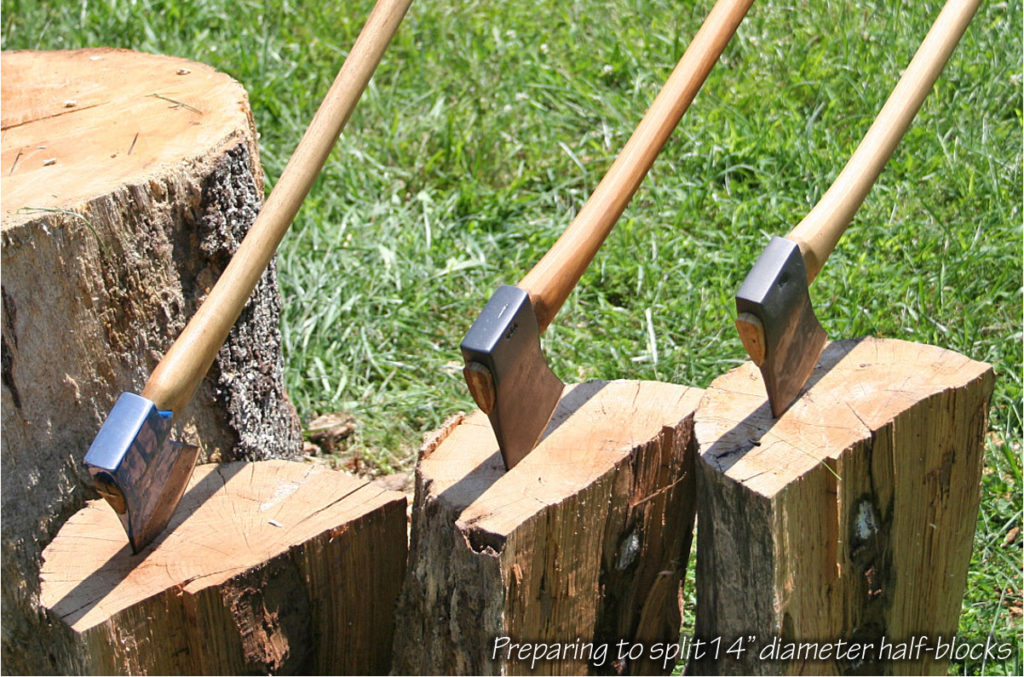
Right off the bat, I noticed that the paint on the Collins was being rubbed off, especially when I’d sink the bit without affecting a crack or split.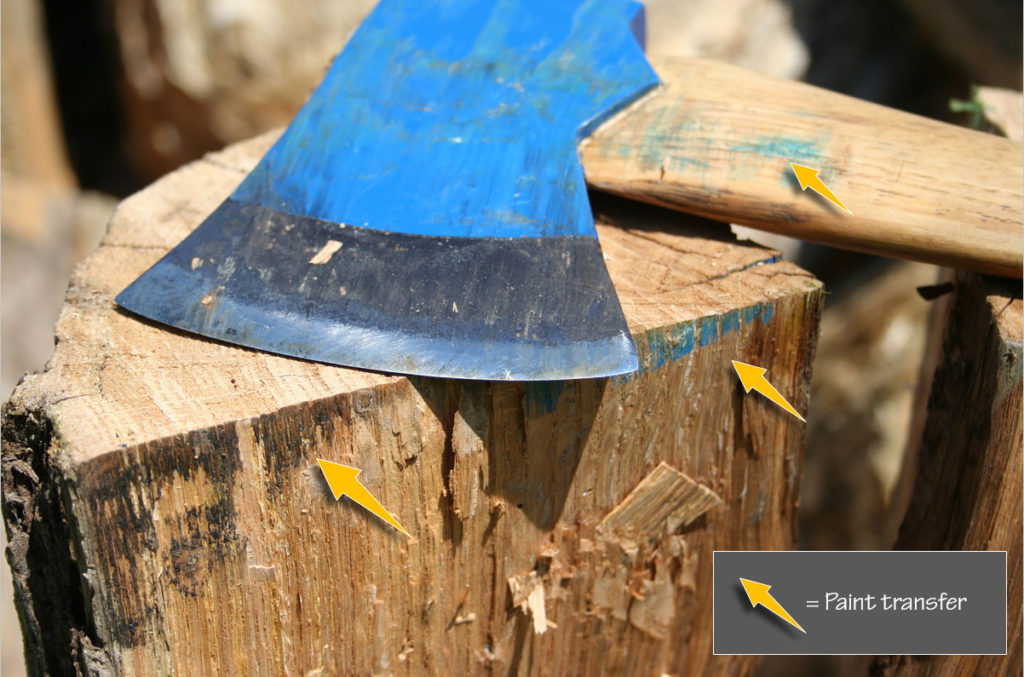
I expected that to happen. What I didn’t expect was to have something similar happen with the Cerakote, but unlike the Collins, the coating hadn’t actually been scraped away. I could see a dull area in the finish, but there were no scratches that cut through to the bare steel.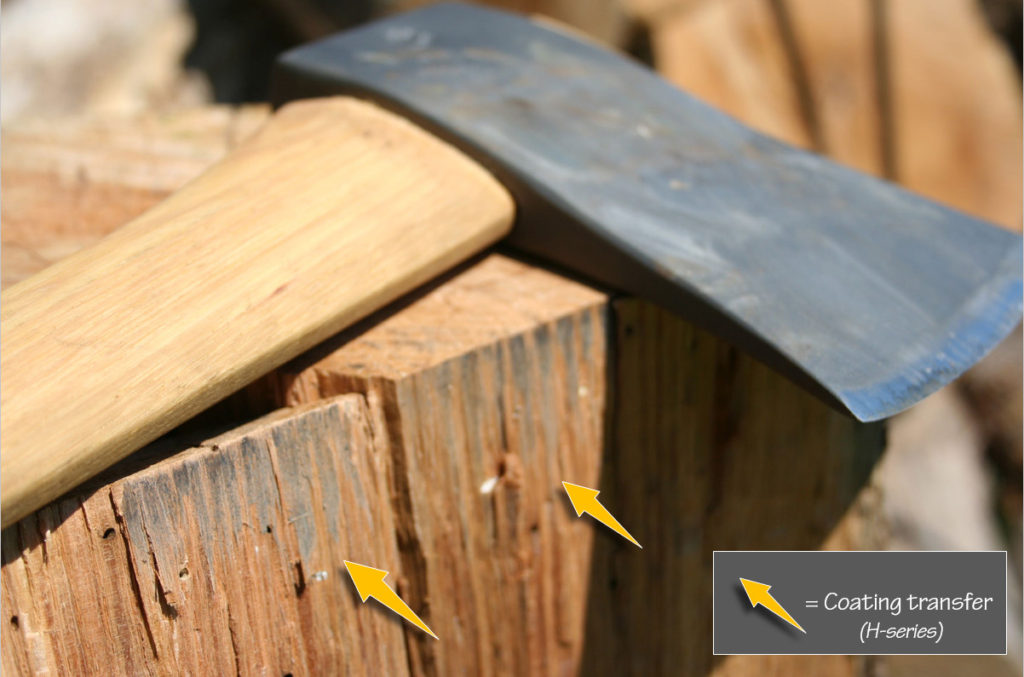
The Elite series coating, which is half as thick (remember?), left nothing on the hardwood billets. With the splitting test finished, it was time to get out of the sun.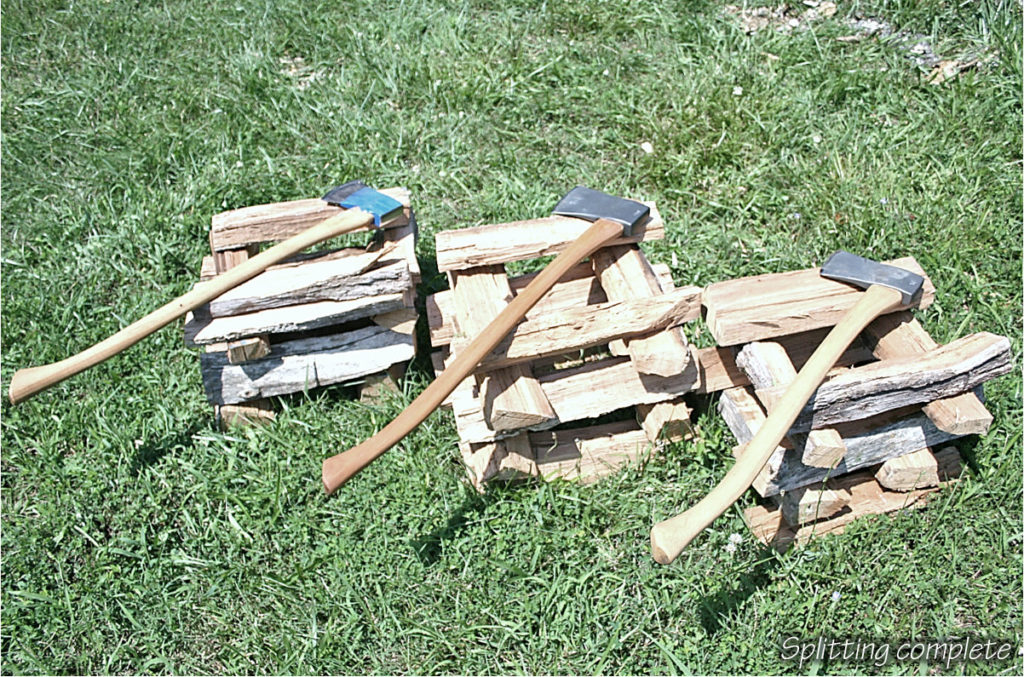
Splitting half rounds doesn’t seem like much of a test, but this was only meant to obtain an initial impression. Keep this in mind as you review the next two photos collages.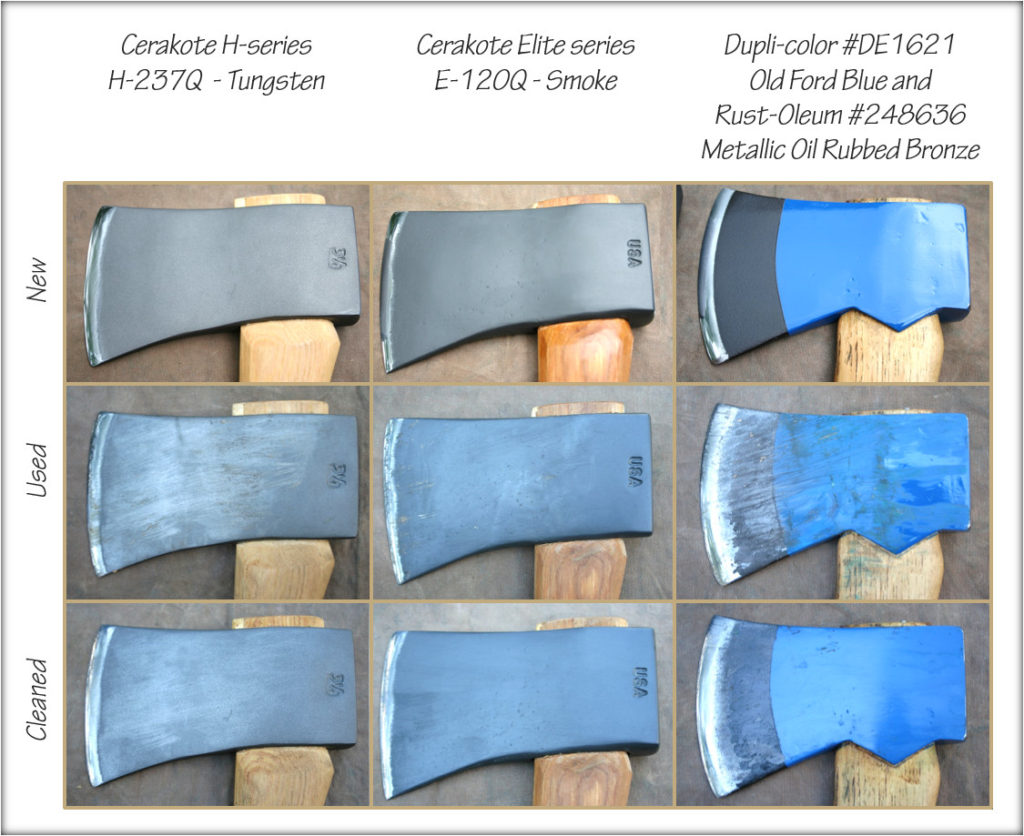
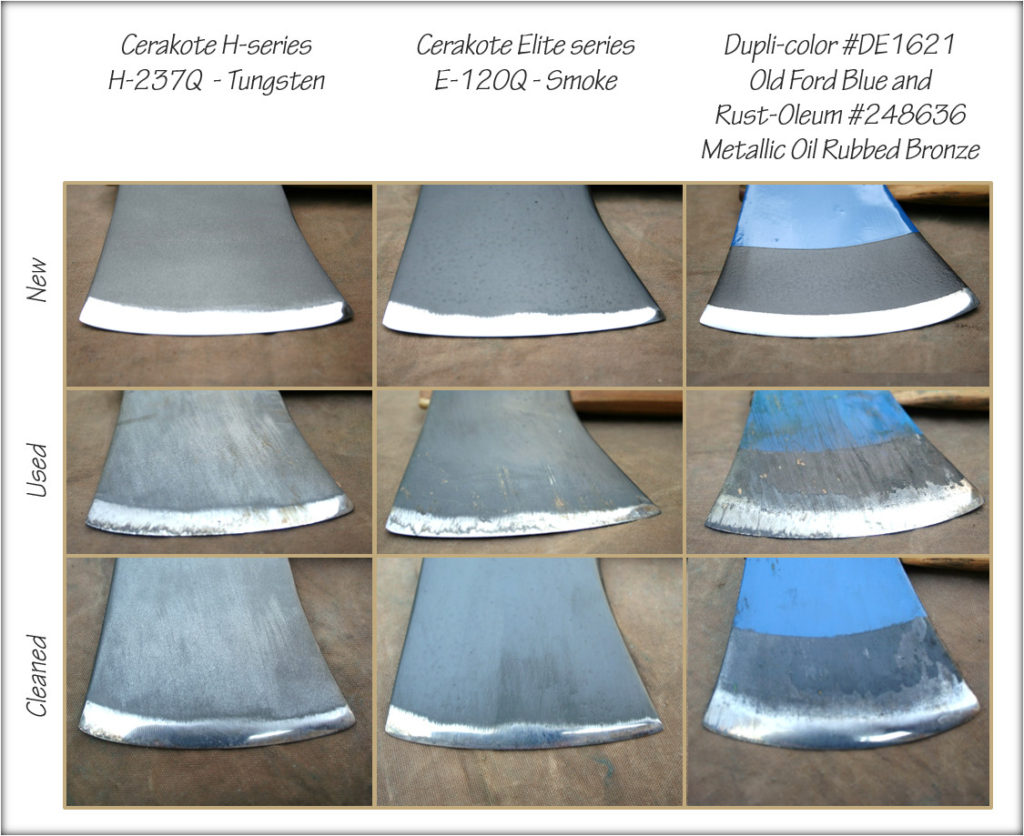 The ‘damage’ shown is the result of bucking an 8” limb and splitting half of a 14” block. Even though I was finished with the chopping phase, I still needed to find out how well Cerakote stood up to being cleaned.
Almost Finished – One of my favorite tests is the ‘Phone Book Test’. I conducted this test as soon as I got home and unpacked the truck. The axes weren’t as sharp as they were when I started, but they were still sharp enough to make confetti out of the yellow pages.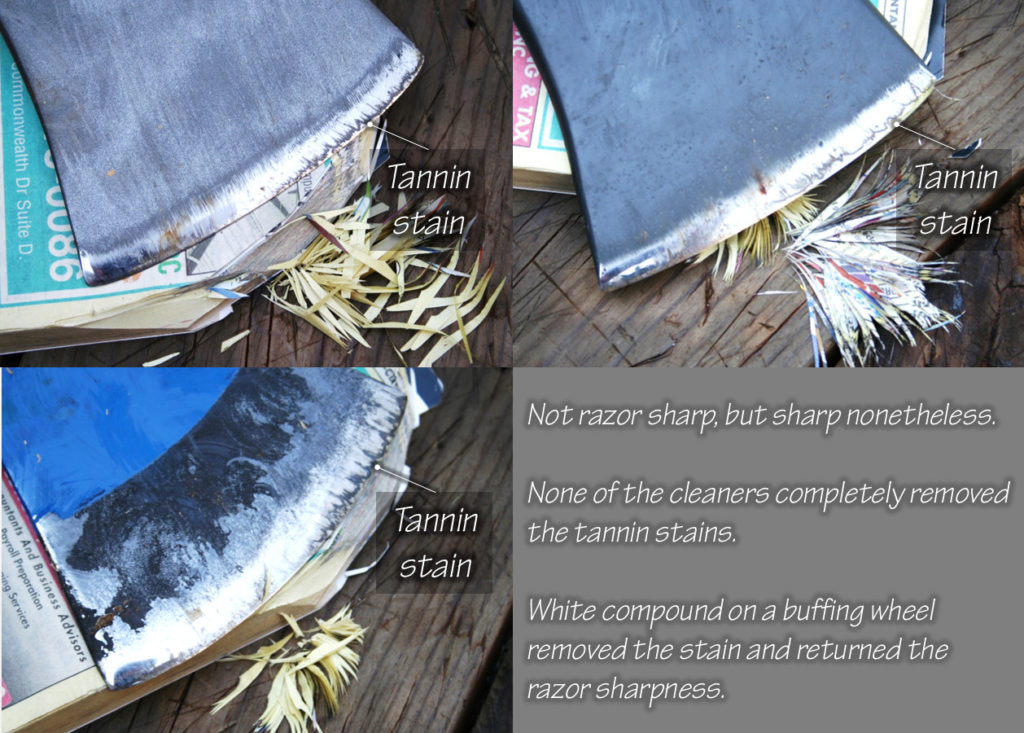
Note the EKG-looking stain on the bit. That was caused by the tannin in the Oak. That stuff is a booger to get off too!
First up was Boeshield’s Blade and Bit cleaner. The photo shows that on the two Cerakoted Council axes, only dirt and pitch were removed during cleaning. It was almost like wiping burnt scrambled eggs out of a non-stick frying pan. Not that I’ve ever had to do that, mind you. The Collins didn’t fare so well. The paint quickly succumbed to the cleaner and was coming off along with dirt and pitch.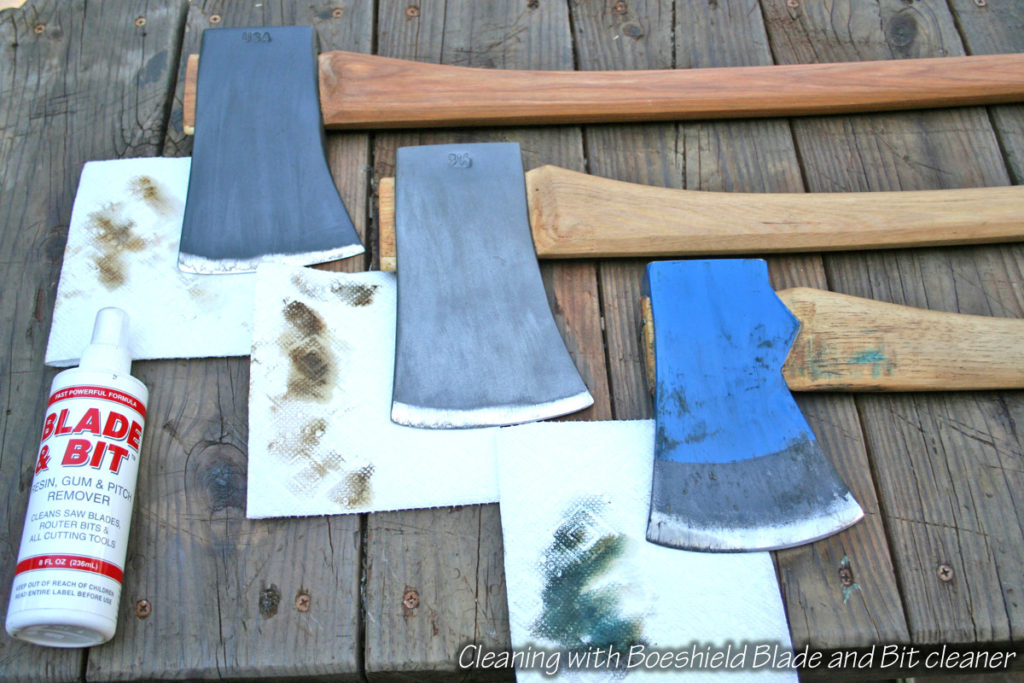
On the other side of the axe, I used CMT’s blade bit cleaner. It got most of the grime off and a little bit of blue paint.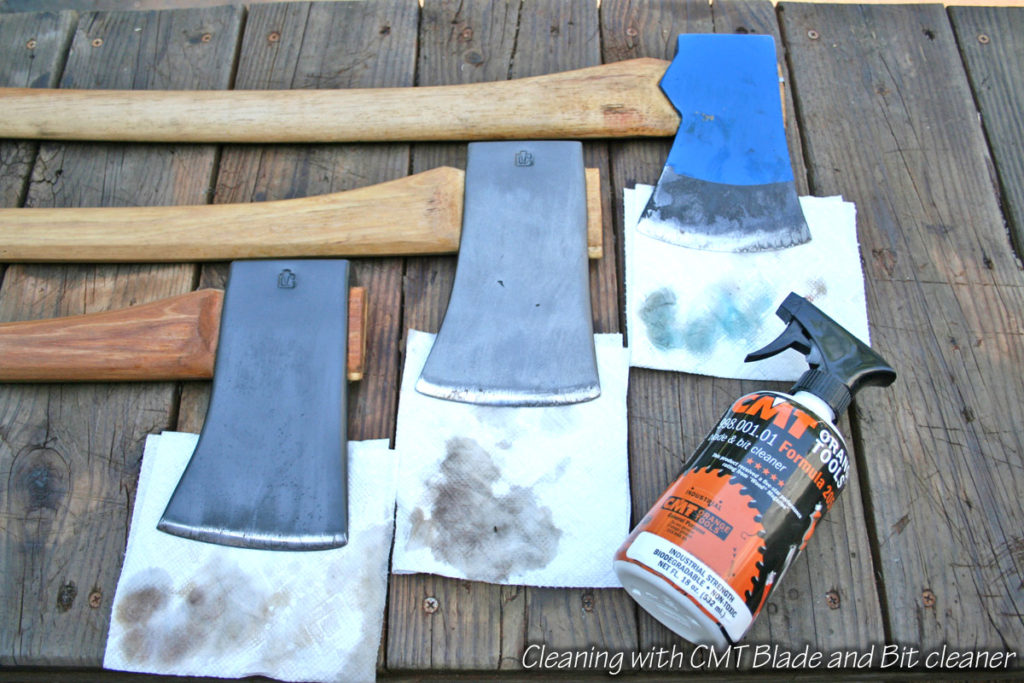
Since the CMT cleaner wasn’t doing its job completely, I hit the CMT side with some denatured alcohol. I got very little of anything off of the Cerakoted axes, but I was still getting paint from the Collins.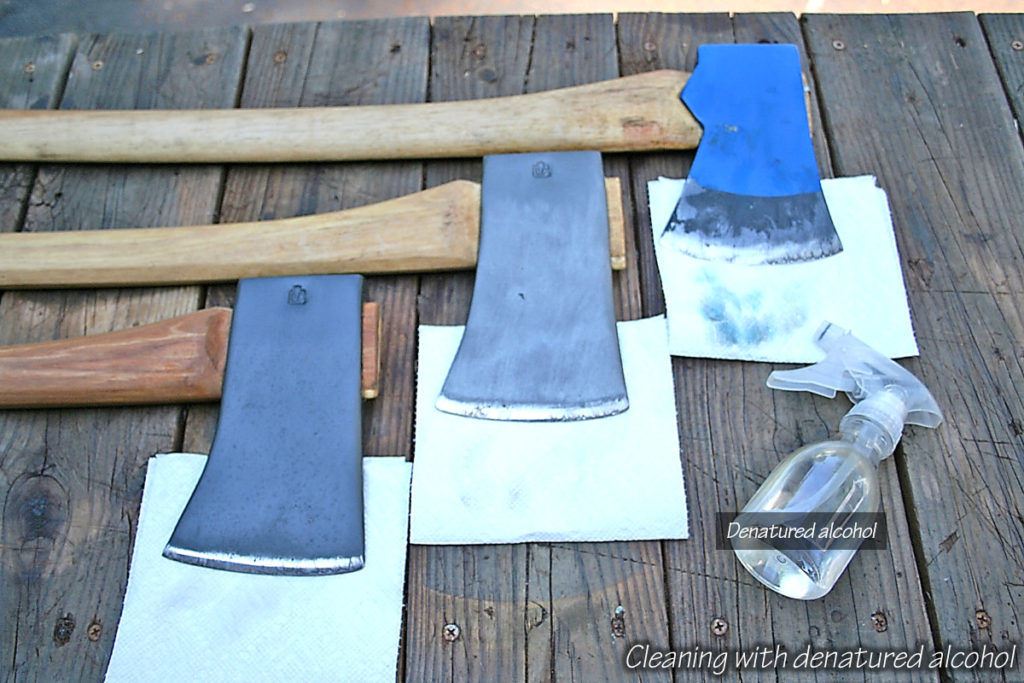
Once the axes were cleaned, I did something that I never do… I put them away dry. Normally, I follow a pretty strict preventative maintenance program and always apply a thin coat of gun oil on my axes. The Cerakote eliminates the need to do that since it creates a perfect oxygen barrier. And since the Collins is the control for this experiment, I left it dry too.
Bottom Line – My findings show that Cerakote’s Elite Series coating outperforms all other protective coatings, creates a relatively maintenance free surface, and can only be likened to body armor for an axe (or any tool).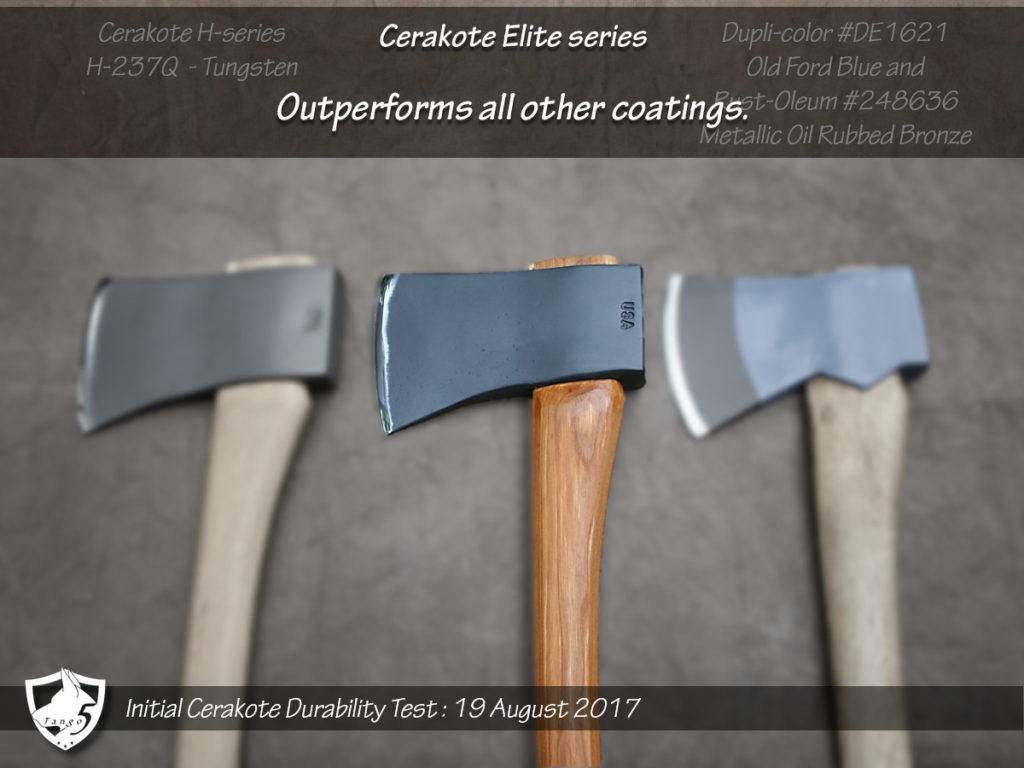
The coating process is not what most would describe as inexpensive; but when you consider how much you save in time, effort, and monetary expenditures to regularly maintain an axe, it may very well be worth it. This experiment will now transition to its long-term phase. I will use these axes for various wood cutting tasks until spring 2018. Upon completion of this phase, I will submit a final, long-term report… with pictures, of course.
Axe Head Specifications
- A: Council Tool Dayton pattern marked ‘3 1/2’
- Head weight: 3.57#
- 27.5° convex grind
- Overall length: 36”
- Finish: Cerakote H-series H-237Q, Tungsten
Cerakote H- Series coatings are durable corrosion-resistant and provide unparalleled levels of hardness and adhesion. These coatings are also resistant to most solvents and chemicals. The foundation for Cerakote H-Series coatings is a unique ceramic technology that imparts both flexibility and excellent wear resistance to the final coating. https://www.cerakoteguncoatings.com/finishes/H-237Q/tungsten/ ⇒
- B: Council Tool Dayton pattern marked ‘USA’
- Head weight: 3.33#
- 27.5° convex grind
- Overall length: 36”
- Finish: Cerakote Elite series E-120Q, Smoke
We have taken the industry leading performance of Cerakote H-Series to the next level and improved hardness, abrasion resistance, and lubricity, all in a thinner application. We have accomplished this by developing an advanced resin technology that enables the incorporation of the highest performance engineered ceramics. https://www.cerakoteguncoatings.com/finishes/E-120Q/smoke/ ⇒
- C: 3.5# Collins (post-66 ) Jersey pattern
- Head weight: 3.5#
- 27.5° convex grind
- Overall length: 35”
- Finish: Dupli-color #DE1621 Old Ford Blue: engine enamel with ceramic, resistant to oil and fluids and heat up to 500° F over Rust-oleum primer over bluing
Dupli-Color® Engine Enamel contains Ceramic Resins for maximum heat dissipation and gloss retention. The resins offer protection from exposure to excessive heat and automotive fluids. Excellent for under-the-hood applications, Dupli-Color Engine Enamel will perform to the most rigorous standards of racing, street rod, and vehicle restoration enthusiasts. This durable formula resists temperatures up to 500°F intermittently and produces a superior finish that will not blister, flake, crack or peel.
https://duplicolor.com/product/engine-enamel-with-ceramic/ ⇒
- Finish: Rust-Oleum #248636 Metallic Oil Rubbed Bronze over bluing
Durable, weather and corrosion-resistant
http://www.rustoleum.com/rustoleum/product-catalog/consumer-brands/stops-rust/metallic/ ⇒
If you want more information on having your axe head Cerakoted call (434-989-1263), email, or drop by the shop.
Thank you again to our guest blogger, Mr. Leslie Hill. You can find him hanging out at the Axe Junkies Group ⇒ on Facebook.